Using an EdgeRouter for my home network
Network
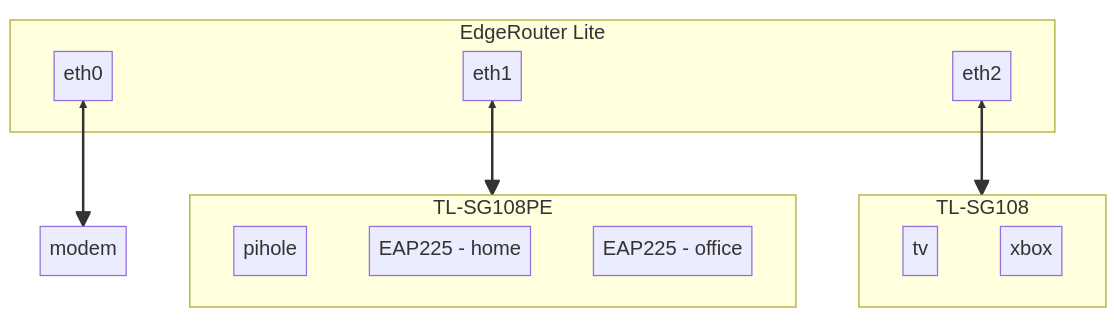
- Router: Ubiquiti EdgeRouter Lite 3
- Managed Switch: TPlink SG-108pe
- Access Points (WiFi): TPLink EAP225 Omada
Basic Router Setup
Reset the EdgeRouter to the default configuration and login to the web interface to get started. It is a good idea to run the basic setup because it will give you a fully functioning home router.
Connect to the EdgeRouter on eth0 and open a web browser to
192.168.1.1. The default username and password is ubnt.
You might need to assign yourself to an IP within the default subnet, like 192.168.1.42.
Don’t forget to create a new admin user during the initial setup. This
will also remove the default ubnt user from the EdgeRouter.
After the EdgeRouter reboots, you will need to re-connect to eth1.
You can connect a modem to eth0 and you should have internet access.
The basic setup wizard defines an appropriate firewall ruleset that
prevents unauthorized inbound connections to your home network.
Configure SSH
Standard SSH key configuration, except you can’t use ssh-copy-id and
have to use the loadkey command from within EdgeOS.
Create new ssh key for managing the EdgeRouter:
ssh-keygen -t ed_25519 -C "email@example.com" -f ~/.ssh/path/edge-id_ed25519
Copy key to EdgeRouter (only /tmp is writable):
scp ~/.ssh/path/edge-id_ed25519.pub user@192.168.1.1:/tmp
Then access the EdgeRouter console and load your key:
configureloadkey <user> /tmp/edge-id_25519.pubcommitsaveexit
Now add a new entry in $HOME/.ssh/config and test the connection.
Try to ssh into your new admin account and verify the ownership of your home directory:
ssh <user>@192.168.1.1ls -la# if needed runsudo chmod -R <user> /home/<user>
Finally, you can disable password based login to the router:
configureset service ssh disable-password-authenticationcommitsaveexit
Initial Configuration
Poke around in the web UI and do some quick initial configuration using the System tab at the bottom of the page.
- Set host name
- Set timezone
- Disable analytics
- Disable UISP
- Disable UBNT Discovery
- Update firmware if available
Enable Hardware Offloading
configureset system offload ipv4 forwarding enableset system offload ipv4 gre enableset system offload ipv4 pppoe enableset system offload ipv4 vlan enableset system offload ipv4 bonding enableset system offload ipv6 forwarding enableset system offload ipv6 pppoe disableset system offload ipv6 vlan enableset system offload ipsec enablecommitsaveexit
Firewall
From the Ubiquiti’s EdgeRouter documentation:
A Zone-Based Firewall assigns each interface to a specific zone. The firewall zones will be used to define what traffic is allowed to flow between the interfaces. The traffic that originates in the EdgeRouter itself will also be assigned to a zone: the local zone.
REMEMBER TO DISCONNECT THE EDGE ROUTER FROM THE INTERNET BEFORE CHANGING THE FIREWALL
My home network has quickly evolved from a single subnet to an environment with several VLAN’s and multiple wireless networks.
I decided that a zone-based firewall policy was going to offer the best trade-offs: More complicated to setup, but conceptually much simpler. Hopefully this makes things easier to maintain and less likely to get wrong.
I want several layers of isolation:
- A
HOMEnetwork for personal and guest devices. This will be the main network, but none of these devices should have management access to the router or establish connections to outside subnets or vlans. - A
WORKnetwork. Only work devices are allowed on this network. Same rules as home, but for work. - An “untrusted”
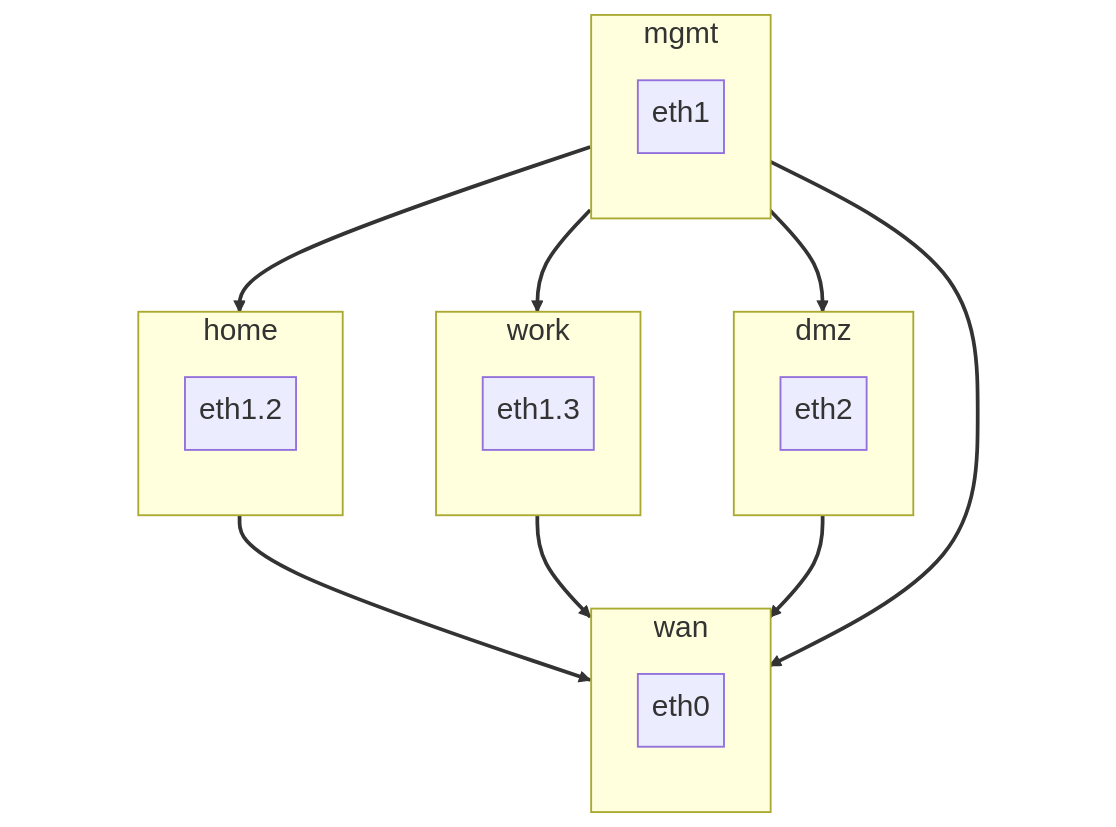
DMZ. More restrictive network than home or work. - Trusted network for management (
MGMT). Access to the router, switches, and access points are limited to this network.
Rules
Each zone is defined using a combination of the following firewall rule sets. Each rule set provides support for both IPv4 and IPv6 networks.
Firewall rule names are limited to 28 characters.
Prevent Unauthorized Inbound Traffic from the Internet
Only allow valid and established connections. Log unauthorized requests.
# IPv4set firewall name wan-lan-4 default-action dropset firewall name wan-lan-4 enable-default-logset firewall name wan-lan-4 rule 1 action acceptset firewall name wan-lan-4 rule 1 description 'allow established connections'set firewall name wan-lan-4 rule 1 log disableset firewall name wan-lan-4 rule 1 protocol allset firewall name wan-lan-4 rule 1 state established enableset firewall name wan-lan-4 rule 1 state related enableset firewall name wan-lan-4 rule 2 action dropset firewall name wan-lan-4 rule 2 description 'drop invalid packets'set firewall name wan-lan-4 rule 2 log disableset firewall name wan-lan-4 rule 2 protocol allset firewall name wan-lan-4 rule 2 state invalid enable# IPv6set firewall ipv6-name wan-lan-6 default-action dropset firewall ipv6-name wan-lan-6 enable-default-logset firewall ipv6-name wan-lan-6 rule 1 action acceptset firewall ipv6-name wan-lan-6 rule 1 description 'allow established connections'set firewall ipv6-name wan-lan-6 rule 1 log disableset firewall ipv6-name wan-lan-6 rule 1 state established enableset firewall ipv6-name wan-lan-6 rule 1 state related enableset firewall ipv6-name wan-lan-6 rule 2 action dropset firewall ipv6-name wan-lan-6 rule 2 description 'drop invalid packets'set firewall ipv6-name wan-lan-6 rule 2 log disableset firewall ipv6-name wan-lan-6 rule 2 state invalid enable
Internet Access
The typical thing to do is allow any outgoing traffic to reach the internet. However, I want to block certain devices from ever being able to communicate to the outside world, such as my printer and “smart” TV.
# IPv4set firewall name lan-wan-4 default-action acceptset firewall name lan-wan-4 rule 1 action dropset firewall name lan-wan-4 rule 1 description 'block outbound traffic from printer'set firewall name lan-wan-4 rule 1 log disableset firewall name lan-wan-4 rule 1 protocol allset firewall name lan-wan-4 rule 1 source mac-address '00:15:99:b3:05:77'set firewall name lan-wan-4 rule 2 action dropset firewall name lan-wan-4 rule 2 description 'block outbound traffic from tv'set firewall name lan-wan-4 rule 2 log disableset firewall name lan-wan-4 rule 2 protocol allset firewall name lan-wan-4 rule 2 source mac-address '98:06:3c:a7:0b:07'# IPv6set firewall ipv6-name lan-wan-6 default-action acceptset firewall ipv6-name lan-wan-6 rule 1 action dropset firewall ipv6-name lan-wan-6 rule 1 description 'block outbound traffic from printer'set firewall ipv6-name lan-wan-6 rule 1 log disableset firewall ipv6-name lan-wan-6 rule 1 protocol allset firewall ipv6-name lan-wan-6 rule 1 source mac-address '00:15:99:b3:05:77'set firewall ipv6-name lan-wan-6 rule 2 action dropset firewall ipv6-name lan-wan-6 rule 2 description 'block outbound traffic from tv'set firewall ipv6-name lan-wan-6 rule 2 log disableset firewall ipv6-name lan-wan-6 rule 2 protocol allset firewall ipv6-name lan-wan-6 rule 2 source mac-address '98:06:3c:a7:0b:07'
Allow All Traffic
# IPv4set firewall name allow-all-4 default-action accept# IPv6set firewall ipv6-name allow-all-6 default-action accept
Block All Traffic
# IPv4set firewall name block-all-4 default-action drop# IPv6set firewall ipv6-name block-all-6 default-action drop
Allow Pi-hole
I use Pi-hole for local DNS so I need to allow incoming queries to the management network. Otherwise, it should only allow valid and established connections and log any unauthorized requests.
# IPv4set firewall name lan-mgmt-4 default-action dropset firewall name lan-mgmt-4 enable-default-logset firewall name lan-mgmt-4 rule 1 action acceptset firewall name lan-mgmt-4 rule 1 description 'allow established connections'set firewall name lan-mgmt-4 rule 1 log disableset firewall name lan-mgmt-4 rule 1 protocol allset firewall name lan-mgmt-4 rule 1 state established enableset firewall name lan-mgmt-4 rule 1 state related enableset firewall name lan-mgmt-4 rule 2 action dropset firewall name lan-mgmt-4 rule 2 description 'drop invalid packets'set firewall name lan-mgmt-4 rule 2 log disableset firewall name lan-mgmt-4 rule 2 protocol allset firewall name lan-mgmt-4 rule 2 state invalid enableset firewall name lan-mgmt-4 rule 3 action acceptset firewall name lan-mgmt-4 rule 3 description 'allow dns'set firewall name lan-mgmt-4 rule 3 log disableset firewall name lan-mgmt-4 rule 3 protocol tcp_udpset firewall name lan-mgmt-4 rule 3 destination port 53# IPv6set firewall ipv6-name lan-mgmt-6 default-action dropset firewall ipv6-name lan-mgmt-6 enable-default-logset firewall ipv6-name lan-mgmt-6 rule 1 action acceptset firewall ipv6-name lan-mgmt-6 rule 1 description 'allow established connections'set firewall ipv6-name lan-mgmt-6 rule 1 state log disableset firewall ipv6-name lan-mgmt-6 rule 1 state established enableset firewall ipv6-name lan-mgmt-6 rule 1 state related enableset firewall ipv6-name lan-mgmt-6 rule 2 action dropset firewall ipv6-name lan-mgmt-6 rule 2 description 'drop invalid packets'set firewall ipv6-name lan-mgmt-6 rule 2 log disableset firewall ipv6-name lan-mgmt-6 rule 2 state invalid enableset firewall ipv6-name lan-mgmt-6 rule 3 action acceptset firewall ipv6-name lan-mgmt-6 rule 3 description 'allow dhcpv6'set firewall ipv6-name lan-mgmt-6 rule 3 destination port 546set firewall ipv6-name lan-mgmt-6 rule 3 protocol udpset firewall ipv6-name lan-mgmt-6 rule 3 log disableset firewall ipv6-name lan-mgmt-6 rule 3 source port 547set firewall ipv6-name lan-mgmt-6 rule 4 action acceptset firewall ipv6-name lan-mgmt-6 rule 4 description 'allow icmpv6'set firewall ipv6-name lan-mgmt-6 rule 4 log disableset firewall ipv6-name lan-mgmt-6 rule 4 protocol ipv6-icmp
Restrict Management Access
Do not allow management access to the EdgeRouter. Log unauthorized requests.
This rule will be used to define what local traffic is allowed into the EdgeRouter. For now this means only DHCP requests.
# IPv4set firewall name lan-local-4 default-action dropset firewall name lan-local-4 enable-default-logset firewall name lan-local-4 rule 1 action acceptset firewall name lan-local-4 rule 1 description 'allow dhcp'set firewall name lan-local-4 rule 1 log disableset firewall name lan-local-4 rule 1 protocol udpset firewall name lan-local-4 rule 1 destination port 67# IPv6set firewall ipv6-name lan-local-6 default-action dropset firewall ipv6-name lan-local-6 enable-default-logset firewall ipv6-name lan-local-6 rule 1 action acceptset firewall ipv6-name lan-local-6 rule 1 description 'allow established connections'set firewall ipv6-name lan-local-6 rule 1 state log disableset firewall ipv6-name lan-local-6 rule 1 state established enableset firewall ipv6-name lan-local-6 rule 1 state related enableset firewall ipv6-name lan-local-6 rule 2 action dropset firewall ipv6-name lan-local-6 rule 2 description 'drop invalid packets'set firewall ipv6-name lan-local-6 rule 2 log disableset firewall ipv6-name lan-local-6 rule 2 state invalid enableset firewall ipv6-name lan-local-6 rule 3 action acceptset firewall ipv6-name lan-local-6 rule 3 description 'allow dhcpv6'set firewall ipv6-name lan-local-6 rule 3 destination port 546set firewall ipv6-name lan-local-6 rule 3 protocol udpset firewall ipv6-name lan-local-6 rule 3 log disableset firewall ipv6-name lan-local-6 rule 3 source port 547set firewall ipv6-name lan-local-6 rule 4 action acceptset firewall ipv6-name lan-local-6 rule 4 description 'allow icmpv6'set firewall ipv6-name lan-local-6 rule 4 log disableset firewall ipv6-name lan-local-6 rule 4 protocol ipv6-icmp
Zones
A zone must define how to handle incoming traffic from every other zone in the network. This is part of what makes a zone-based firewall robust and resilient to mistakes. Any flow of traffic between two zones that has not been defined (at both ends!) will get dropped.
WAN
set zone-policy zone wan default-action dropset zone-policy zone wan interface eth0set zone-policy zone wan from local firewall name allow-all-4set zone-policy zone wan from local firewall ipv6-name allow-all-6set zone-policy zone wan from mgmt firewall name lan-wan-4set zone-policy zone wan from mgmt firewall ipv6-name lan-wan-6set zone-policy zone wan from home firewall name lan-wan-4set zone-policy zone wan from home firewall ipv6-name lan-wan-6set zone-policy zone wan from work firewall name lan-wan-4set zone-policy zone wan from work firewall ipv6-name lan-wan-6set zone-policy zone wan from dmz firewall name lan-wan-4set zone-policy zone wan from dmz firewall ipv6-name lan-wan-6
HOME
set zone-policy zone home default-action dropset zone-policy zone home interface eth1.2set zone-policy zone home from wan firewall name wan-lan-4set zone-policy zone home from wan firewall ipv6-name wan-lan-6set zone-policy zone home from local firewall name allow-all-4set zone-policy zone home from local firewall ipv6-name allow-all-6set zone-policy zone home from mgmt firewall name allow-all-4set zone-policy zone home from mgmt firewall ipv6-name allow-all-6set zone-policy zone home from work firewall name block-all-4set zone-policy zone home from work firewall ipv6-name block-all-6set zone-policy zone home from dmz firewall name block-all-4set zone-policy zone home from dmz firewall ipv6-name block-all-6
WORK
set zone-policy zone work default-action dropset zone-policy zone work interface eth1.3set zone-policy zone work from wan firewall name wan-lan-4set zone-policy zone work from wan firewall ipv6-name wan-lan-6set zone-policy zone work from local firewall name allow-all-4set zone-policy zone work from local firewall ipv6-name allow-all-6set zone-policy zone work from mgmt firewall name allow-all-4set zone-policy zone work from mgmt firewall ipv6-name allow-all-6set zone-policy zone work from home firewall name block-all-4set zone-policy zone work from home firewall ipv6-name block-all-6set zone-policy zone work from dmz firewall name block-all-4set zone-policy zone work from dmz firewall ipv6-name block-all-6
DMZ
set zone-policy zone dmz default-action dropset zone-policy zone dmz interface eth2set zone-policy zone dmz from wan firewall name wan-lan-4set zone-policy zone dmz from wan firewall ipv6-name wan-lan-6set zone-policy zone dmz from local firewall name allow-all-4set zone-policy zone dmz from local firewall ipv6-name allow-all-6set zone-policy zone dmz from home firewall name block-all-4set zone-policy zone dmz from home firewall ipv6-name block-all-6set zone-policy zone dmz from work firewall name block-all-4set zone-policy zone dmz from work firewall ipv6-name block-all-6set zone-policy zone dmz from mgmt firewall name allow-all-4set zone-policy zone dmz from mgmt firewall ipv6-name allow-all-6
MGMT
set zone-policy zone mgmt default-action dropset zone-policy zone mgmt interface eth1set zone-policy zone mgmt from wan firewall name wan-lan-4set zone-policy zone mgmt from wan firewall ipv6-name wan-lan-6set zone-policy zone mgmt from local firewall name allow-all-4set zone-policy zone mgmt from local firewall ipv6-name allow-all-6set zone-policy zone mgmt from home firewall name lan-mgmt-4set zone-policy zone mgmt from home firewall ipv6-name lan-mgmt-6set zone-policy zone mgmt from work firewall name lan-mgmt-4set zone-policy zone mgmt from work firewall ipv6-name lan-mgmt-6set zone-policy zone mgmt from dmz firewall name lan-mgmt-4set zone-policy zone mgmt from dmz firewall ipv6-name lan-mgmt-6
LOCAL
set zone-policy zone local default-action dropset zone-policy zone local local-zoneset zone-policy zone local from wan firewall name wan-lan-4set zone-policy zone local from wan firewall ipv6-name wan-lan-6set zone-policy zone local from mgmt firewall name allow-all-4set zone-policy zone local from mgmt firewall ipv6-name allow-all-6set zone-policy zone local from home firewall name lan-local-4set zone-policy zone local from home firewall ipv6-name lan-local-6set zone-policy zone local from work firewall name lan-local-4set zone-policy zone local from work firewall ipv6-name lan-local-6set zone-policy zone local from dmz firewall name lan-local-4set zone-policy zone local from dmz firewall ipv6-name lan-local-6
VLAN
Tagged, Untagged, and Not Member.
Tagging a VLAN ID to a port allows devices that support VLAN tagging (such as your access point) to route packets according to their tag.
Setting a port as “untagged” for a VLAN ID will let “regular” devices receive traffic from the specified VLAN(s).
When a port is set to not be a member of a VLAN ID, traffic on that VLAN will not get sent to that port.
For example, the TP-Link TL-SG108PE has management access only on
VLAN 1. If you want your computer to have access to the management
interface, the switch port you plug you computer into must be marked
as “untagged”. If you want to restrict access to the management
interface on the switch, all of the other ports must set VLAN 1 as “Not Member”.
TP-Link TL-SG108PE
- Set enable
802.1Q VLAN. - Use the
802.1Q PVIDtab to configure the VLAN ID for untagged ports.
This table represents a VLAN configuration where ports 1, 2, 3, 4, and 8 all belong to the management network and will receive traffic for all VLAN IDs.
Ports 5, 6, and 7 will only receive traffic tagged for VLAN 2, however the ports must be marked as “untagged” on the switch so that regular devices (computers, printers, etc.) will get the packets.
Additionally, ports 5, 6, and 7 have been removed as members for VLAN
1 and 3 so that traffic from my MGMT and WORK network will not end
up on devices intended to be used on the HOME network.
| VLAN ID | VLAN Name | Member Ports | Tagged Ports | Untagged Ports |
|---|---|---|---|---|
| 1 | Default | 1-4,8 | 1-4,8 | |
| 2 | Home | 1-8 | 1-4,8 | 5-7 |
| 3 | Work | 1-4,8 | 1-4,8 |
DHCP
Each network gets its own interface and subnet to make it easier to see where devices are connected.
Static IP address assignments are managed through DHCP reservations.
| Network | Interface | Subnet |
|---|---|---|
| mgmt | eth1 | 192.168.1.1/24 |
| home | eth1.2 | 10.0.2.1/24 |
| work | eth1.3 | 10.0.3.1/24 |
| dmz | eth2 | 172.16.1.1/24 |
Static Reservations
| Name | IP |
|---|---|
| TL-SG108PE (Switch) | 192.168.1.2 |
| pihole | 192.168.1.3 |
| EAP225-home (AP) | 192.168.1.4 |
| EAP225-office (AP) | 192.168.1.5 |
| ML-2955DW (Printer) | 10.0.2.13 |
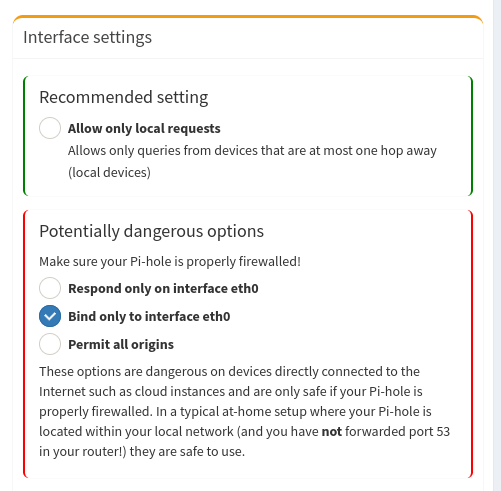
Using Pi-hole for DNS
I use Pi-hole for my home DNS server. It lives on the management network and can is the only DNS entry for each DHCP server on the EdgeRouter.
In order to use pi-hole across different network subnets you have to
enable the option Bind only to interface eth0 on the DNS settings
page.
WiFi & Access Points
- 5GHz only
- Broadcast at lowest power
- Each network is on a separate vlan and subnet
- Each access point is on a non-interfering channel
AirPlay, Printing, and mDNS
You can use “mDNS repeating” to allow access to airplay and printing
across subnets/vlans. This can be enabled using the Config Tree tab
and going to Services -> mDNS.
You must enable at least two interfaces.
configureset service mdns repeater interface eth1set service mdns repeater interface eth1.2commitsaveexit
Bufferbloat and Smart Queue Management (SQM)
The EdgeRouter supports Smart Queue Management, which can reduce the overall latency of your internet connection.
- Go to QoS tab
- Add a new smart queue policy
- Set WAN interface to
eth0 - Set upload and/or download bandwidth to 20% of internet speedtest results
- https://fast.com/
- https://www.waveform.com/tools/bufferbloat
References
- https://help.ui.com/hc/en-us/articles/115006567467-EdgeRouter-Hardware-Offloading#4
- https://help.ui.com/hc/en-us/articles/204952154-EdgeRouter-Zone-Based-Firewall
- https://help.ui.com/hc/en-us/articles/204960094-EdgeRouter-Configuration-and-Operational-Mode
- https://help.ui.com/hc/en-us/articles/204976374
- https://networkjutsu.com/how-to-configure-edgerouter-lite-part-two/
- https://www.forshee.me/ubiquiti-edgerouter-lite-setup-part-1-the-basics/